Communicator or Lync generates an Outlook integration error
25 de março de 2013 às 11:04 | Publicado em Uncategorized | Deixe um comentárioEm alguns cenários o cliente Lync ou OCS pode mostrar mensagem de erro de integração com o Outlook, ocasionando alguns dos seguintes erros:
- Problema de visualização de Presença no Outlook;
- Mensagem ‘Cannot integrate with Outlook because Outlook mail profile is not configured correctly’ ;
- Problemas para se conectar ao Exchange Web Services;
- Problemas para visualização de Free/Busy;
- Presença do cliente não é atualizada no calendário do Outlook e vice e versa;
- Mensagem ‘Cannot connect to Microsoft Office Outlook to open the desired folder. Please close any open outlook dialog boxes and try again’;
- Falha para salvar as comunicações na pasta de Conversas do Outlook,
Os seguintes métodos podem ser aplicados dependendo de cada cenário:
Presence issues in Outlook or unable to save Communicator or Lync conversations in Outlook
Method 1: Verify or enable "Conversation History" in Communicator or Lync
1. Close Outlook.
2. In Communicator or Lync, click Tools, click Options, click to enable the Save my instant message conversations in the Outlook Conversation History folder check box, and then click OK.
3. Open Outlook, verify that the Conversation History folder is populated in Outlook. the Conversation History folder is typically located above the Deleted Items folder.
Method 2: Verify that Outlook is configured to display presence
1. In Outlook 2003, click Tools, click Options, click Contacts, make sure that the Display online status next to name check box is enabled and the Only display status for people in the To and Cc lines when you rest the pointer on the name check box is not enabled.
2. In Outlook 2007, click Tools, click Options, click Other.
3. Make sure that the Display online status next to name check box is enabled and the Display online status in the To and Cc fields only when mouse pointer rests on a Person is enabled.
Method 3: Verify the EnableEWSFallback and the DisablePresenceNote Registry Keys
1. Close Outlook and Communicator or Lync.
2. Open registry editor.
3. Navigate to HKEY_LOCAL_MACHINE\SOFTWARE\Policies\Microsoft\Communicator\EnableEwsFallback=1 or HKEY_LOCAL_MACHINE\SOFTWARE\Policies\Microsoft\Lync\EnableEwsFallback=1
4. Verify the it is set to 1:
a. If it is not, set it to 1 and proceed to step 5
b. If it is set, proceed to step 7
5. Restart Communicator or Lync.
6. In Communicator or Lync, type a new note, clear the note, and verify that the note field is empty.
7. Go back into Registry Editor.
8. Navigate to HKEY_LOCAL_MACHINE\SOFTWARE\Policies\Microsoft\Communicator\DisablePresenseNote=1 or HKEY_LOCAL_MACHINE\SOFTWARE\Policies\Microsoft\Lync\DisablePresenseNote=1.
9. Set DisablePresenseNote to 0.
10. Restart Outlook, and then restart Communicator or Lync.
Method 4: Manually adjust the registry keys (*This method may not be possible for some customer because of IT policy restrictions.)
1. Close Communicator or Lync, Outlook, and any other Office applications
2. Open Registry Editor.
3. Locate the following registry sub keys:
a. HKEY_CURRENT_USER\Software\Microsoft\Office\11.0\Common\PersonaMenu.
§ In the right-hand panel Make sure (Default) value is not set, EnableDynamicPresence data is set to 1, QueryServiceForStatus is set to 2, and RTCApplication is set to 3.
b. HKEY_CURRENT_USER\Software\Microsoft\Office\12.0\Common\PersonaMenu.
§ In the right-hand panel Make sure (Default) value is not set, QueryServiceForStatus is set to 2, and RTCApplication is set to 3.
c. HKEY_CURRENT_USER\Software\Microsoft\Office\12.0\Outlook\IM.
§ In the right-hand panel Make sure (Default) value is not set, EnablePresence data is set to 2, and SetOnlineStatusLevel is set to 3.
4. Start Communicator or Lync.
5. Start Outlook.
If the issue(s) persists, create the registry key below. This registry key provides data that enables logging for the MSO-Communicator presence feature set, showing exactly what was happening when Outlook requested presence information.
1. Click Start, and then click Run.
2. In the Open box, type REGEDIT, and then click OK to start Registry Editor.
3. Navigate to Key: HKEY_CURRENT_USER\Software\IM Providers.
4. Create the following DWORD value: OfficePresenceLogging with Value: 1.
The log file is created in the %userprofile%\Tracing folder and the filename is OfficePresence-#.log (where # is an integer).
Cannot integrate with Outlook because Outlook mail profile is not configured correctly or Cannot connect to Exchange Web Services
Method 1: Remove and then re-add Microsoft Office Communicator 2007 or Lync Add-in for Outlook:
1. Close Office Communicator or Lync.
2. In Outlook, click Tools, click Trust Center, select Add-ins. In the Add-ins dialog box, next to Manage, select COM Add-ins, and then click Go. In the COM Add-ins dialog box, select the Microsoft Office Communicator 2007 Add-in or Conversation History Add-in for Microsoft Lync 2010, click Remove, click OK, and then restart Outlook.
3. In Outlook, click Tools, click Trust Center, click Add-ins. In the Add-ins dialog box, next to Manage, select COM Add-ins, and then click Go. In the COM Add-ins dialog box, click Add… .
4. Navigate to \Program Files\Microsoft Office Communicator\ocoffice.dll or \Program Files\Microsoft Lync\ocoffice.dll.
5. Click OK, and then quit Outlook.
6. Restart Communicator or Lync.
7. Restart Outlook.
Method 2: Repair or rebuild your mail profile:
1. Close Communicator or Lync and Outlook.
2. Open the Control Panel, and then double-click Mail. On 64-bit operating systems, you must select 32-bit Control Panel, and then select the Mail applet.
3. Click Show Profiles.
4. Select the profile, and then click Properties.
5. Click Email Accounts.
6. Click the E-mail tab, and then click Repair.
7. In the E-mail Address field enter your Communicator or Lync sign-in address, for example: someone@<sip domain>.com.
8. Click Next.
9. Click Finish, and then restart Outlook and allow the profile to load.
10. Close Outlook after profile setup is complete.
11. Restart Communicator or Lync.
12. Restart Outlook.
13. If the repair does not resolve the issue, you can try to recreate the mail profile.
Method 3: Recreate the mail profile
1. Close Communicator or Lync & Outlook.
2. Create a new profile:
a. Open the Control Panel, and then double-click Mail. On 64-bit operating systems, you must select 32-bit Control Panel, and then select the Mail applet.
b. Click Show Profiles.
c. Select Add, and enter a name for the new profile.
d. During the Auto Account setup process, change the default e-mail address from its current value to your Communicator or Lync sign-in address.
e. Click Next and the new profile is configured automatically.
3. Delete old profile
a. Select old mail profile.
b. Select Remove.
c. Click Yes.
d. Click OK, and then close the Mail applet.
4. Re-launch Outlook and allow the profile to load.
5. Close Outlook after the profile setup is complete.
6. Restart Communicator or Lync.
7. Restart Outlook.
Scenario 1 : ‘The email address that is used in your default Outlook profile differs from the sign-in address that is used in Lync 2010’ error
Resolution 1: Verify the user’s primary SMTP address. To do this, follow these steps:
1. Verify that the user’s Primary SMTP setting matches the user’s SIP Address setting.
2. If you change the Primary SMTP or SIP Address setting, wait 24-48 hours for replication to occur.
Resolution 2: Disable the email check. To do this, follow these steps.
Note Outlook integration may not work correctly after you perform these steps.
1. Click Start , click Run, type regedit, and then press ENTER.
2. Locate, and then right-click the following registry subkey:
o HKEY_LOCAL_MACHINE\SOFTWARE\Policies\Microsoft\Communicator
or
o HKEY_LOCAL_MACHINE\SOFTWARE\Policies\Microsoft\Lync
3. Point to New, and then click DWORD Value.
4. Type DisableEmailComparisonCheck as the name of new registry entry, and then press ENTER.
5. Double-click DisableEmailComparisonCheck, type 1 in the Value data box, and then click OK.
6. Close Registry Editor.
7. Restart Lync 2010 and Outlook.
Scenario 2 : ‘Outlook is not installed or configured correctly. Repair or reinstall Outlook, and then sign out and sign back in to Lync’ error
1. Click Start , click Run, type regedit, and then press ENTER.
2. Locate and then delete the following registry subkey:
o HKEY_CURRENT_USER\Software\Clients\Mail
3. Locate the following subkey, and then make sure that Microsoft Outlook is set as the default mail client:
o HKEY_LOCAL_MACHINE\Software\Clients\Mail
4. Restart the computer.
Cannot connect to Exchange Web Services or unable to view Free/Busy information
Method 7: Validate the Free/Busy information by using the Outlook client
If you are unable to view free/busy in Office Communicator or Lync, you must first verify that you can view Free/Busy in Outlook by scheduling a new meeting request with multiple attendees, and then using the Scheduling Assistant to view their Free/Busy information.
Scenario 1: ‘Lync is in the process of determining the location of Exchange Web Services’ or the ‘Lync cannot connect to the Exchange server. Lync will attempt to retry the connection’ error message
These messages typically occur when you sign in to Microsoft Lync 2010. These messages typically disappear after several minutes. If one of these error messages persists or the error message changes to an Outlook Integration error, follow the steps in the scenario in this article that is most appropriate to the error. One of these errors may also occur when you enter incorrect credentials when you try to connect to your Outlook profile, or if you click Cancel in the credentials dialog box.
How to repair Office and perform a clean installation of Office Communicator or Lync
1. Close Communicator or Lync and Outlook.
2. Click Start, click Control Panel, in Windows XP, click Add/Remove Programs, in Windows Vista, click Programs and Features.
3. Select Communicator or Lync.
4. Click Remove/Uninstall.
5. Select Microsoft Office installation.
6. Click Change.
7. Follow the prompts to run a repair.
8. Restart the computer.
9. Reinstall Office Communicator or Lync from an approved site.
10. Start Communicator Lync.
Start Outlook.
Como Instalar Web Apps Server para Lync Server 2013
15 de março de 2013 às 16:02 | Publicado em deplo, deployment, Lync 2013, Web Apps Server | Deixe um comentárioTambém conhecido como WAC Server, a instalação do Office Web Apps Server é necessária para que o Lync Server 2013 possua suporte para apresentações de PowerPoint. Ou seja, pra que o cliente faça colaboração de apresentações de PowerPoint do seu cliente Lync esse é um papel necessário.
O Office Web Apps Server é um servidor da família Office que permite que documentos do Word, Excel, PowerPoint e OneNote sejam visualizados em um Browser com todos os recursos e funções do formato original. Além de funcionar com o Lync Server 2013 também permite que usuários acessem documentos Office pelo SharePoint 2013, Exchange Server 2013 e Lync Server 2013.
O setup desse produto é relativamente simples e rápido. Os passos abaixo demonstram o setup do Web Apps para trabalhar com o Lync Server 2013:
Pré Requisitos
O Office Web Apps não pode ser instalado com qualquer outro servidor do Lync Server e o sistema operacional deve server o Windows Server 2008 R2 Service Pack 1 (ainda não existem informações quanto a compatibilidade com o Windows Server 2012, entretanto funciona perfeitamente).
Outro ponto importante é a necessidade de um certificado para ser instalado no servidor Web Apps Server e que será associado ao IIS. Toda a comunicação entre o Lync Server 2013 e o Web Apps Server é criptografa por certificado digital para evitar que o conteúdo seja visualizado indevidamente. Para que funcione apenas internamente, a utilização de um certificado interno é suficiente. Esse certificado deve possuir os seguintes pontos:
- Esse certificado deve ser gerado por uma Unidade Certificadora confiável e deve incluir o FQDN que será utilizado para acesso ao Web Apps Server (por exemplo, webapps.contoso.com) no Subject do certificado. Caso seja uma Farm de Web Apps Server, o FQDN de cada um dos servidores pertencentes a essa Farm devem estar em Subject Alternate Name (SAN) do certificado;
- O certificado deve ser confiável também pelos servidores Front End do ambiente Lync Server 2013;
- O certificado deve ser exportável, deve utilizar o template Web Server e deve ser do tipo Server Certicates.
- O campo Friendly name do certificado deve ser único de todos os certificados instalados no servidor. Esse campo será utilizado na linha de comando que irá associar o certificado ao web site do IIS;
- O FQDN do campo SAN não deve iniciar com asterisco (*);
Entretanto, caso seja utilizada a colaboração com usuários externos (federados, remotos ou anônimos) um certificado externo adquirida de uma empresa de certificados digitais será necessário. Esse certificado irá cobrir apenas a configuração do Web Apps Server para utilização internamente na rede.
Deve ser instalado os seguintes updates e produtos no servidor que receberá o Lync Server 2013:
Assim que os updates estiverem instalados, é necessário a instalação do IIS com determinados componentes. Para instalar o IIS no Windows 2008 R2 SP1, digite o seguinte comando no PowerShell:
Import-Module ServerManager
Add-WindowsFeature Web-Server,Web-WebServer,Web-Common-Http,Web-Static-Content,Web-App-Dev,Web-Asp-Net,Web-Net-Ext,Web-ISAPI-Ext,Web-ISAPI-Filter,Web-Includes,Web-Security,Web-Windows-Auth,Web-Filtering,Web-Stat-Compression,Web-Dyn-Compression,Web-Mgmt-Console,Ink-Handwriting,IH-Ink-Support
Para Windows 2012:
Import-Module ServerManager
Add-WindowsFeature Web-Server,Web-Mgmt-Tools,Web-Mgmt-Console,Web-WebServer,Web-Common-Http,Web-Default-Doc,Web-Static-Content,Web-Performance,Web-Stat-Compression,Web-Dyn-Compression,Web-Security,Web-Filtering,Web-Windows-Auth,Web-App-Dev,Web-Net-Ext45,Web-Asp-Net45,Web-ISAPI-Ext,Web-ISAPI-Filter,Web-Includes,InkandHandwritingServices,NET-Framework-Features, NET-Framework-Core, NET-HTTP-Activation, NET-Non-HTTP-Activ, NET-WCF-HTTP-Activation45
Instalação do Office Web Apps Server 2013:
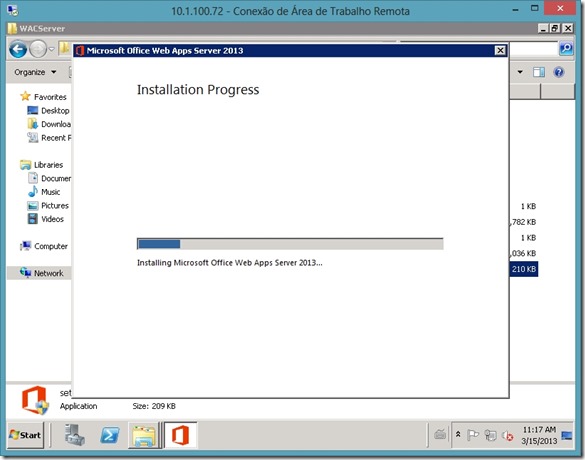
O download do produto pode ser feito por esse link de um arquivo .img. A instalação é simples e pode ser feita utilizando as opções padrão.
Configuração do Office Web Apps Server
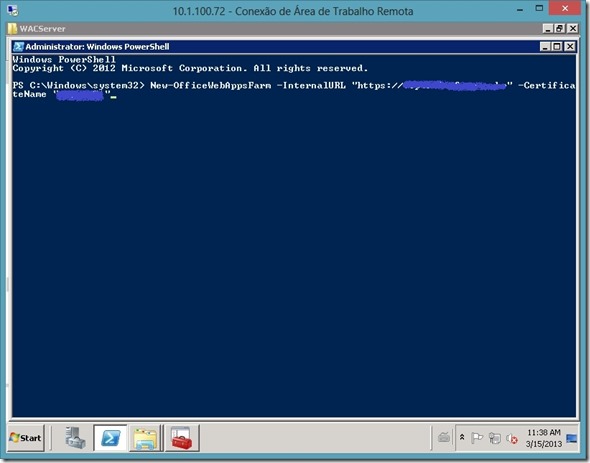
Deve ser criado o site (ou farm) utilizando uma linha simples de comando PowerShell. O certificado também já deve estar instalado no servidor. Execute a seguinte linha de comando:
New-OfficeWebAppsFarm -InternalURL “<URL_WEBAPPS>” –CertificateName “<FrindlyNameCertificado>”
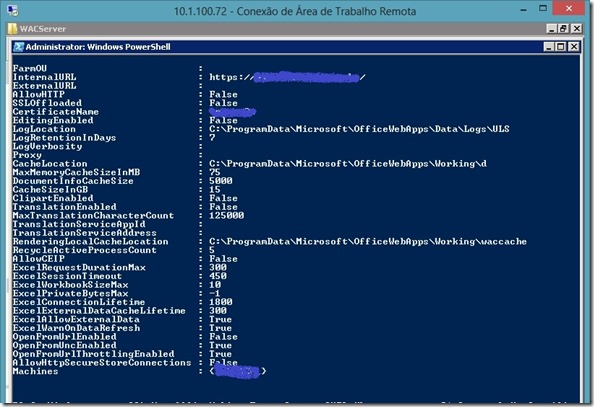
O resultado será o mostrado abaixo:
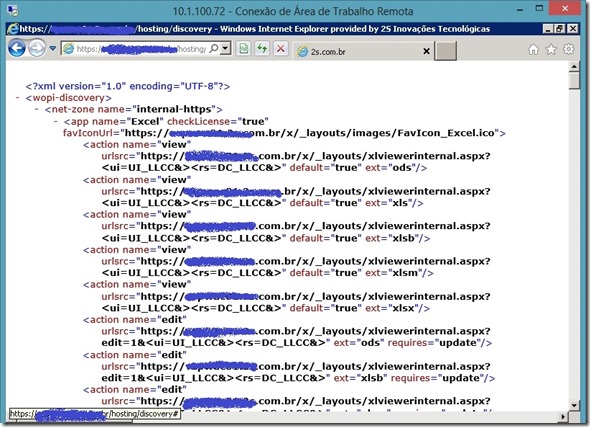
Para testar se foi configurado perfeitamente, basta abrir o Internet Explorer no servidor e na barra de endereços chamar a URL “https://URL_WEBAPPS/Hosting/Discovery”. O resultado deve ser a exibição de uma página com XML contendo informações sobre a publicação. Esse caminho será utilizado pelo Lync Server 2013 para localizar e se comunicar com o Web Apps Server e pelo cliente para acessar o conteúdo de reunião compartilhado.
Caso ocorra algum erro para acesso a página, execute a reparação do .NET com o seguinte comando:
%systemroot%\Microsoft.NET\Framework64\v4.0.30319\aspnet_regiis.exe –iru
Configurando o Lync Server 2013
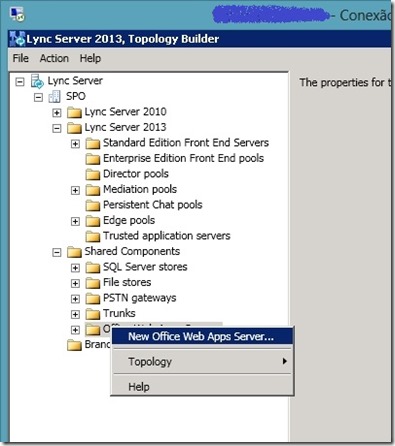
É necessário apenas adicionar o servidor Web Apps Server na topologia do Lync Server 2013. Acesse o Topology Builder e faça o download da topologia atual. Em Site, Shared Components, clique com o botão direito e então em New Office Web Apps Server.
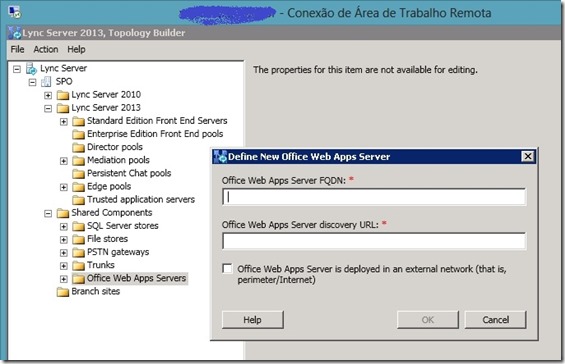
Preencha com a URL que será utilizada para acesso ao Web Apps Server. Caso o servidor seja instalado na DMZ marque o checkbox mostrado.
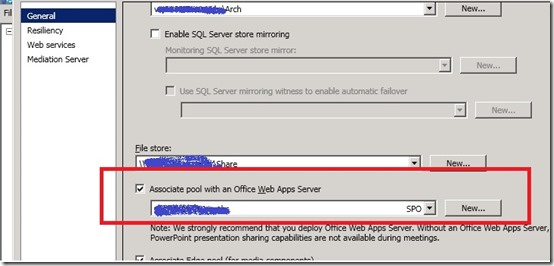
Agora nas propriedades do Front End, associe o Web Apps Server ao Front End, como a figura abaixo:
Publique a topologia.
Validação
- No servidor Front End, localize pelos Eventos ID 41032 e 41034, ambos com Source LS Data MCU. Eles irão conter informações de que o servidor Front End conseguiu se comunicar com o Web Apps Server pela URL de Discovery e que a colaboração de conteúdo PowerPoint foi habilitado.
- Faça um teste prático!! Inicie o compartilhamento de uma apresentação!
Exportar Contatos OCS/Lync2010 e Importar no Lync 2013
13 de março de 2013 às 11:37 | Publicado em Uncategorized | Deixe um comentárioAnteriormente ao Lync 2013 existia uma ferramenta chamada DBIMPEXP.EXE utilizada, entre outras coisas, para Exportar e Importar configurações e também a lista de Contato dos usuários para um arquivo de extensão .XML. Essa ferramenta não existe mais e foi substituída por uma série de comandos PowerShell no Lync 2013 com funções parecidas que não utilizam um arquivo XML e sim um com extensão .ZIP.
Para que você consiga Importar os seus contatos do OCS/Lync 2010 no Lync 2013, siga os passos abaixo:
1. No OCS/Lync2010, exporte a lista de Contato dos usuários utilizando o seguinte comando:
Dbimpexp.exe /hrxmlfile:<Contacts4Export.xml> /sqlserver:<fqdnSQLServer>
2. Copie o arquivo XML gerado e copie para o servidor Lync 2013 ou em algum local que possa acessá-lo. Utilizando o comando abaixo, converta o arquivo do formato OCS/Lync2010 para o formato Lync 2013
Convert-CsUserData -InputFile "E:\Contatos OCS\Contacts4Export.xml" -OutputFile "E:\Contatos OCS\Contacts4Import.zip" -TargetVersion Current
3. Após o arquivo convertido no padrão .ZIP Lync2013, realize o Import das informações utilizando o seguinte comando:
Update-CsUserData -FileName "E:\Contatos OCS\Contacts4Import.zip"
Importante: O SIP do usuário exportado e do usuário de destino, que receberá os contatos importados deverão ser os mesmos.
Microsoft Lync 2013 for iPhone and iPad
13 de março de 2013 às 09:41 | Publicado em Ipad, iPhone, Lync 2013 | Deixe um comentárioFoi lançado ontem, 12/03/2012, o Lync 2013 client para iPhone e iPad e já está diponível para download da Apple Store.
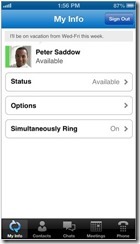
Com as funções de Voz e vídeo, presença, instant messaging, conferencia e recursos de chamada em uma única interface, o cliente Lync para iPhone e iPad necessita que o servidor Lync esteja com o último Cumulative Update instalado – já falamos sobre isso aqui. O aplicativo terá também a versão em Portugues.
Abaixo alguns screenshots da interface.
Fonte: https://itunes.apple.com/us/app/microsoft-lync-2013-for-iphone/id605841731?mt=8
Update para Microsoft Lync 2013 – 32 e 64-Bit
7 de março de 2013 às 10:55 | Publicado em Cliente, Lync 2013, Updates | Deixe um comentárioJunto com o CU1 a Microsoft lançou updates para o cliente Lync 2013 contendo correção de problemas e melhorias de performance.
O seguinte release contém link para download dos updates separados por Lyncloc (Cliente Lync 2013) e Msores (Office 2013 com Lync 2013).
Microsoft Lync Server 2013 Documentation Help File
7 de março de 2013 às 10:17 | Publicado em Documentação, Lync 2013 | Deixe um comentárioAqui pode ser feito download do Lync Server 2013 Documentation Help, arquivo que contém um arquivo compilado de help com extensão .chm de toda a documentação técnica do Lync Server 2013 disponível no site da Microsoft Technet Library, incluindo as últimas atualizações sobre o Cumulative Update 1.
Deployment Tool for Exchange 2013
7 de março de 2013 às 08:47 | Publicado em deployment, Exchange 2010, Exchange 2013 | Deixe um comentárioA Microsoft lançou a ferramenta Deployment Tool para o Exchange 2013 essa semana.
O Deployment Tool Assistant é um portal da Web acessado via Browser que, a partir de uma séria de questões que devem ser respondidas, irá criar instruções para serem seguidas para a instalação do Exchange 2013.
A ferramenta pode ser acessada aqui.
A ferramenta está sendo desenvolvida e por enquanto não está disponível todos os cenários. Para um ambiente On-premises por enquanto apenas instruções para uma nova instalação pode ser utilizado. Para cenários de migração a informação é que será liberado nos próximos meses.
Também pode ser utilizado o Deployment Assistant Tool para Exchange 2010, acessando o link aqui.
Exportar Contatos OCS/Lync2010 e Importar no Lync 2013
6 de março de 2013 às 18:19 | Publicado em Contatos, Lync 2013, Migração | Deixe um comentárioAnteriormente ao Lync 2013 existia uma ferramenta chamada DBIMPEXP.EXE utilizada, entre outras coisas, para Exportar e Importar configurações e também a lista de Contato dos usuários para um arquivo de extensão .XML. Essa ferramenta não existe mais e foi substituida por uma série de comandos PowerShell no Lync 2013 com funções parecidas que não utilizam um arquivo XML e sim um com entensão .ZIP.
Para que você consiga Importar os seus contatos do OCS/Lync 2010 no Lync 2013, siga os passos abaixo:
1. No OCS/Lync2010, exporte a lista de Contato dos usuários utilizando o seguinte comando:
Dbimpexp.exe /hrxmlfile:<Contacts4Export.xml> /sqlserver:<fqdnSQLServer>
2. Copie o arquivo XML gerado e copie para o servidor Lync 2013 ou em algum local que possa acessá-lo. Utilizando o comando abaixo, converta o arquivo do formato OCS/Lync2010 para o formato Lync 2013
Convert-CsUserData -InputFile "E:\Contatos OCS\Contacts4Export.xml" -OutputFile "E:\Contatos OCS\Contacts4Import.zip" -TargetVersion Current
3. Após o arquivo convertido no padrão .ZIP Lync2013, realize o Import das informações utilizando o seguinte comando:
Update-CsUserData -FileName "E:\Contatos OCS\Contacts4Import.zip"
Importante: O SIP do usuário exportado e do usuário de destino, que receberá os contatos importados deverão ser os mesmos.
Lync 2013 – Serviço Front End não inicia “Source: LS User Services” e “Event id: 30962”
6 de março de 2013 às 15:30 | Publicado em Error, Lync 2013, SQL Mirror | Deixe um comentárioEm um cenário em que está sendo utilizado o Mirror Database para o back-end o log de Transaction Log da database cresce de forma muito rápida. Caso ele atinga o tamanho máximo configurado para essa database o serviço Front End dos servidores Lync não serão iniciados.
O seguinte erro é mostrado no Event Viewer:
Source: LS User Services
Event ID: 30962
Task Category: LS User Services
Level: Error
Keywords: Classic
User: N/A
Computer: front-end_server_name
Description:
Connection to back-end database succeeded, but failed to execute registration stored procedure on the back-end. This error should not occur under normal operating conditions. Contact product support.
Back-end Database: rtcxds Sql native error: 9002 Connection string of:
driver={SQL Server Native Client 11.0};Trusted_Connection=yes;AutoTranslate=no;server=back-end_server_name\RTC;Failover_Partner=back-end_server_name\RTC;database=rtcxds;
Cause: Possible issues with back-end database.
Resolution:
Ensure the back-end is functioning correctly.
Para verificar o tamanho e a capacidade atual do Transaction Log do SQL, execute a query DBCC SQLPERF (LOGSPACE) no SQL Server Management Studio.
Workaround:
Esse é um comportamento esperado para o Transaction Log quando se utiliza Mirror Database e aumentar o tamanho de armazenamento não é interessante pelo fato de ocupar o espaço que foi desenhado para as databases em si e remover o limite de armazenamento é uma atitude pior ainda, pois pode chegar a ocupar todo o seu disco!
Bem, então a maneira mais fácil de corrigir isso é realizar o backup da base de dados ou do transaction log para liberar espaço. O ideal é que as bases façam parte de uma rotina de backup corporativa com tempo de retenção de fitas e controle adequado.
Lync 2013 – Cumulative Update (CU1) Fevereiro de 2013
6 de março de 2013 às 14:37 | Publicado em Uncategorized | Deixe um comentárioTags: cumulative Update, Lync 2013, microsoft update, sql databases
Method 1: Cumulative Server Update Installer
The Cumulative Server Update Installer applies all updates for the appropriate server role in one operation. To use the Cumulative Server Update Installer, follow these steps.
Note If User Account Control (UAC) is turned on, you must start the Cumulative Server Update Installer by using elevated permissions to make sure that all updates are installed correctly.
-
Download the Cumulative Server Update Installer. To do this, go to the following Microsoft Download Center website:
-
Run the Cumulative Server Update Installer by using the UI or by using a command line.
Note The UI provides a clear indication of which updates are installed when you click Install Updates.
To run the Installer, run the following command, together with the appropriate switches for your situation:LyncServerUpdateInstaller.exe [/silentmode [/forcereboot]] | [/extractall]
Notes
-
The /silentmode /forcereboot switch applies all applicable updates in the background, and then automatically restarts the server at the end of the installation process if this is necessary.
-
The /extractall switch extracts the updates from the installer and saves the updates in a subfolder that is named “Extracted” in the folder in which you ran the command.
-
Method 2: Microsoft Update
Lync Server 2013 updates are also available from the Microsoft Update
Note After you install the updates for Lync Server 2013 by using Microsoft Update, you must also update the databases on the back end servers.
Update the database after the installation
After you install the update for the Core Components server role on a Lync Server 2013 Enterprise Edition front end server or on a Lync Server 2013 Standard Edition server, the updated SQL databases on the server are dropped. To apply the database changes, run the following cmdlet.
Lync Server 2013 Standard Edition
Install-CsDatabase -ConfiguredDatabases -SqlServerFqdn SE.FQDN -Verbose
Note You must run the cmdlet on the Lync Server 2013 Standard Edition server.
Lync Server 2013 Enterprise Edition
You must perform several configuration operations, depending on the kind of Lync Server 2013 Enterprise Edition back end servers that you are using.
Note Different kinds of Lync Server 2013 Enterprise Edition back end server include mirrored Enterprise Edition back end servers and mirrored Enterprise Edition back end servers that have the Central Management Server collocated.
-
If the Lync Server 2013 Enterprise Edition back end servers do not have SQL mirroring configured, run the following cmdlet to apply the changes:
Install-CsDatabase -ConfiguredDatabases -SqlServerFqdn FEBE.FQDN -Verbose
Note In a Lync Server 2013 Enterprise Edition environment in which the archiving or monitoring services are collocated with a Lync Server 2013 Enterprise Edition back end server, run this cmdlet on the Enterprise Edition front end server.
-
If the Lync Server 2013 Enterprise Edition back end servers have SQL mirroring configured, follow these steps to apply the database changes:
-
Run the following cmdlet to retrieve the mirror database state:
Get-CsDatabaseMirrorState -PoolFqdn Pool.FQDN -Verbose
-
In the returned results, the value of the StateOnPrimary field should be “Principal” for all the databases that are associated with the server pool.
-
If an SQL database mirroring witness is deployed, some databases may fail over to the primary database, and other databases may fail over to the mirror database. If you do not configure all databases to fail over to the primary database before you run the Uninstall-CsMirrorDatase cmdlet, the databases are split across both servers.
-
-
Run the following cmdlet to remove the mirror:
Uninstall-CsMirrorDatabase -DatabaseType Application -SqlServerFQDN EEBE.FQDN -SqlInstanceName SQLInstanceName -DropExistingDatabasesOnMirror -Verbose
-
Run the following cmdlet to apply the changes:
Install-CsDatabase -ConfiguredDatabases -SqlServerFqdn EEBE.Fqdn -Verbose
Note In a Lync Server 2013 Enterprise Edition environment in which the archiving or monitoring services are collocated with an Enterprise Edition back end server, run this cmdlet on the Lync Server 2013 Enterprise Edition back end server.
-
Run the following cmdlet to reinstall the mirror:
Install-CsMirrorDatabase -DatabaseType Application -SqlServerFQDN EEBE.Fqdn -SqlInstanceName SQLInstanceName -FileShare MirrorFileshare -Verbose
-
Run the following cmdlet to retrieve the mirror database state:
Get-CsDatabaseMirrorState -PoolFqdn Pool.FQDN -Verbose
Note In the results, the StateOnPrimary field should be Principal for all databases that are associated with the server pool.
-
-
If the Lync Server 2013 Enterprise Edition back end servers have SQL mirroring configured and the Central Management database installed, follow these steps to apply the database changes:
-
Run the following cmdlet to retrieve the mirror database state:
Get-CsDatabaseMirrorState -PoolFqdn Pool.FQDN -Verbose
Notes
-
In the returned results, the value of the StateOnPrimary field should be “Principal” for all the databases that are associated with the server pool.
-
If an SQL database mirroring witness is deployed, some databases may fails over to the primary database, and other databases may fail over to the mirror database. If you do not configure all databases to fail over to the primary database before you run the Uninstall-CsMirrorDatase cmdlet, the databases are split across both servers.
-
-
Run the following cmdlet to remove the mirror:
Uninstall-CsMirrorDatabase -DatabaseType Application -SqlServerFQDN EEBE.FQDN -SqlInstanceName SQLInstanceName -DropExistingDatabasesOnMirror -Verbose
-
Run the following cmdlet to apply the changes to the Lync Server 2013 Enterprise Edition back end server:
Install-CsDatabase -ConfiguredDatabases -SqlServerFqdn EEBE.FQDN -Verbose
Note In a Lync Server 2013 Enterprise Edition environment in which the archiving or monitoring services are collocated with an Enterprise Edition back end server, run this cmdlet on the Enterprise Edition back end server.
-
Run the following cmdlet to apply the changes to the Central Management Server database:
Install-CsDatabase -CentralManagementDatabase -SqlServerFqdn CMS.FQDN -SqlInstanceName DBInstanceName -Verbose
Note In a Lync Server 2013 Enterprise Edition environment in which the Central Management Service is collocated with an Enterprise Edition back-end server, run this cmdlet from the Lync Server 2013 Enterprise Edition front-end server.
-
Run the following cmdlet to reinstall the mirror:
Install-CsMirrorDatabase -DatabaseType Application -SqlServerFQDN EEBE.FQDN -SqlInstanceName SQLInstanceName -FileShare MirrorFileshare -Verbose
-
Run the following cmdlet to retrieve the mirror database state:
Get-CsDatabaseMirrorState -PoolFqdn Pool.FQDN -Verbose
Note In the results, the StateOnPrimary field should be Principal for all databases that are associated with the server pool.
-
-
To apply the changes to the Monitoring back end database, following these steps:
-
If the Archiving and Monitoring databases are not collocated, run the following cmdlet to apply the database changes:
Install-CsDatabase -ConfiguredDatabases -SqlServerFqdn ArchMonBE.FQDN -VerboseNote
In a Lync Server 2013 Enterprise Edition environment in which the archiving or monitoring services are not collocated with an Enterprise Edition back end server, run this cmdlet on the Enterprise Edition front end server.
-
After the Lync Server 2013 Enterprise Edition front end server or the Lync Server 2013 Standard Edition server is updated, run the following cmdlet to update the Central Management Store:
Install-CsDatabase -CentralManagementDatabase -SqlServerFqdn CMS.FQDN -SqlInstanceName DBInstanceName -Verbose
Note In a Lync Server 2013 Standard Edition environment, run the cmdlet on the Standard Edition server.
To enable the Mobility service, run the following cmdlet:
Enable-CsTopology
Blog no WordPress.com.
Entries e comentários feeds.
